FreedomKnot (TM)
The FreedomKnot has its very own Web Site,
with fun graphics and rhymes.
This page is merely so that you can compare it to the other knots on my site.
|
Step 1:

Tie a Starting Knot as shown, then cross the right
(blue) lace over the left (purple) lace to form an "O" in the middle. The blue
lace is now the left lace.
|
Step 2:

Make the left (blue) lace into a loop and begin to wrap it around the back of the
"O" in the middle of the laces.
|
Step 3:

Feed the end of the left (blue) loop through the hole to end up in front.
|
Step 4:

Now, make the right (purple) lace into a loop, this time wrapping it around the
front of the "O" in the middle.
|
Step 5:
Feed the end of the right (purple) loop through the hole to end up behind.
|
Step 6:

Now, simply pull the loops to tighten the knot. Like my Secure Knot,
the whole twisted mess of the previous drawing will rearrange itself into a neat
finished knot.
|
|
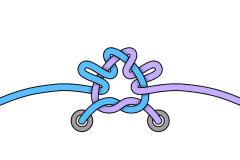
NOTE:
The final drawing above shows a stylised version of the finished knot in order to
follow what goes where. When pulled tight, the sides of the knot come together in
the middle and effectively hide the whole double-twisted top section.
|