Surgeon's Shoelace Knot
My Mum taught me this secure knot when I was still quite young.
|
Step 1:

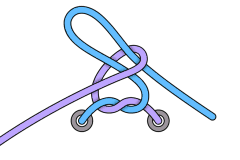
Tie a Starting Knot as shown, then make the right (blue) lace into a "loop" by simply
doubling it back onto itself.
|
Step 2:

Take the left (purple) lace and pass it around to the right, going behind the right loop.
|
Step 3:

Continue the left (purple) lace around the right loop to end up in front.
|
Step 4:

Start to feed the left (purple) lace into the "hole" that has just been made.
|
Step 5:

Pull the left (purple) lace through the "hole" to form a "loop" on the right hand side. Unlike the
Standard Knot, don't pull it tight just yet!
|
Step 6:

Wrap the right (purple) loop around the left (blue) lace for the second time so that it once again ends up in front.
|
Step 7:

Feed the right (purple) loop back through the "hole" for the second time. This is the "secret recipe" that makes
this knot secure.
|
Step 8:

Now, simply pull the loops to tighten the knot. Like my Secure Knot, the whole twisted
mess of the previous drawing will rearrange itself into a neat finished knot.
|
NOTE:
The final drawing above shows a stylised version of the finished knot in order to follow what goes where. When
pulled tight, the sides of the knot come together in the middle and effectively hide the whole double-twisted top
section.
The result should be a tight, closed knot with a symmetrical, double wrap around the middle, as compared to the
single wrap of a Standard Knot.
|